
12/23 - 12/27
지난번에 만든 프로토타입을 바탕으로 본체를 만들었습니다.
MDF 합판에 스테인을 칠해보니 영 느낌이 살지 않아서, 이번에는 미송 합판으로 만들어 보았어요.
미송 합판이 머루사와 합판이나 자작나무 합판보다는 저렴하기도 하고 무늬도 살아있어서 좋았습니다.
표면도 매끈하니 색칠하기도 좋았어요!

그런데 문제는 조각이 너무 많았다는 것입니다 ㅋㅋㅋㅋ
혼자 칠했으면 서너 시간은 걸렸을 뻔했어요. 어떤 조각들은 심지어 양면으로 칠해야해서 시간이 더 걸렸습니다.
다행히도 동생의 시험이 끝난날(지난주 수요일)에 받아왔더니 동생이 도와준다고 해서 1시간만에 다 칠했습니다!
기말고사가 끝난 날에는 스테인 칠인 것이죠 ㅎㅎ
스테인을 얇게 나뭇결에 따라 바른 다음 -> 마르기를 기다린 후 -> 1000방 사포질을 가볍게 하고 -> 스테인을 다시 칠하고 -> 1000방 사포질을 다시금 가볍게 합니다.
그리고 이 뒤에 작업이 사실 시간이 많이 걸렸어요.
원래는 6칸*4개로 생각하고 있어서 24개의 핀이 필요했습니다.
그래서 아두이노 mega2560 pro mini를 구매했습니다.

아두이노의 칩을 빼고 보드는 mega2560으로, 포트는 uno로 설정해서 통신할 수 있었습니다.
위의 사진과 같이 아래의 표처럼 연결해줍니다.
| MEGA2560 PRO MINI | UNO |
| GND | GND |
| VCC | VIN or 5V(pro mini가 3.3V면 3.3V) |
| TXD | TX |
| RXD | RX |
| RESET | RESET |
그.런.데...
이틀을 다 쏟아부었음에도 불구하고 여기서 메가에 esp8266-01 을 연결하는 방법을 찾아내지 못했습니다.ㅠㅠ
그래서 결국은 사놓았던 nano 33 IoT를 꺼냈습니다.😓
핀의 개수가 적긴 했지만 18개 정도 있어서 6칸*3개로 최종 모델을 수정하고 진행하기로 했습니다.
그래도 나중에 eps8266 정복하고 말거예요!
/*
 * Rui Santos
 * Complete Project Details http://randomnerdtutorials.com
 * Based on the Arduino Ethernet Web Client Example
 * and on the sketch "Sample Arduino Json Web Client" of the Arduino JSON library by Benoit Blanchon (bblanchon.github.io/ArduinoJson)
 */

#include <ArduinoJson.h>
#include <Ethernet.h>
#include <SPI.h>
#include <WiFiNINA.h>
#include "arduino_secrets.h"

//EthernetClient client;
WiFiClient client;

IPAddress server(34,64,143,75);

// Replace with your unique URL resource
const char* resource = "/items/led";

// How your resource variable should look like, but with your own COUNTRY CODE, CITY and API KEY (that API KEY below is just an example):
//const char* resource = "/data/2.5/weather?q=Porto,pt&appid=bd939aa3d23ff33d3c8f5dd1";

const unsigned long HTTP_TIMEOUT = 10000;  // max respone time from server
const size_t MAX_CONTENT_SIZE = 512;       // max size of the HTTP response

#define oneONE 2
#define oneTWO 3
#define oneTHREE 4
#define oneFOUR 5
#define oneFIVE 6
#define oneSIX 7
#define twoONE A0
#define twoTWO A1
#define twoTHREE A2
#define twoFOUR A3
#define twoFIVE A4
#define twoSIX A5
#define threeONE A6
#define threeTWO A7
#define threeTHREE 9
#define threeFOUR 10
#define threeFIVE 11
#define threeSIX 12

#define UpdateSwitch 8

int status = WL_IDLE_STATUS;

DynamicJsonDocument doc(16384);

struct cabinet {
  int id[11];
  char cabinetName[30];
  char cellName[30];
  char itemName[100];
  char etc[2000];
  int ledOn[1];
  };


// ARDUINO entry point #1: runs once when you press reset or power the board
void setup() {
  Serial.begin(9600);
  while (!Serial) {
    ;  // wait for serial port to initialize
  }

  Serial.println("Serial ready");
  while (status != WL_CONNECTED) {
    Serial.print("Attempting to connect to SSID: ");
    Serial.println(ssid);
    // Connect to WPA/WPA2 network. Change this line if using open or WEP network:
    status = WiFi.begin(ssid, pass);

    // wait 10 seconds for connection:
    delay(5000);
  }
  Serial.println("Connected to wifi");

pinMode(oneONE, OUTPUT);
analogWrite(oneONE, 0);
pinMode(oneTWO, OUTPUT);
analogWrite(oneTWO, 0);
pinMode(oneTHREE, OUTPUT);
digitalWrite(oneTHREE, LOW);
pinMode(oneFOUR, OUTPUT);
analogWrite(oneFOUR, 0);
pinMode(oneFIVE, OUTPUT);
analogWrite(oneFIVE, 0);
pinMode(oneSIX, OUTPUT);
digitalWrite(oneSIX, LOW);

pinMode(twoONE, OUTPUT);
analogWrite(twoONE, 0);
pinMode(twoTWO, OUTPUT);
analogWrite(twoTWO, 0);
pinMode(twoTHREE, OUTPUT);
analogWrite(twoTHREE, 0);
pinMode(twoFOUR, OUTPUT);
analogWrite(twoFOUR, 0);
pinMode(twoFIVE, OUTPUT);
analogWrite(twoFIVE, 0);
pinMode(twoSIX, OUTPUT);
analogWrite(twoSIX, 0);

pinMode(threeONE, OUTPUT);
analogWrite(threeONE, 0);
pinMode(threeTWO, OUTPUT);
analogWrite(threeTWO, 0);
pinMode(threeTHREE, OUTPUT);
analogWrite(threeTHREE, 0);
pinMode(threeFOUR, OUTPUT);
analogWrite(threeFOUR, 0);
pinMode(threeFIVE, OUTPUT);
analogWrite(threeFIVE, 0);
pinMode(threeSIX, OUTPUT);
analogWrite(threeSIX, 0);

pinMode(UpdateSwitch, INPUT_PULLUP);

  printWifiStatus();

  if(connect(server)) {


    if(sendRequest(server, resource) && skipResponseHeaders()) {
      String payload = client.readString();//Get the request response payload
      deserializeJson(doc, payload);
      JsonArray Array = doc.as<JsonArray>();
      showLED(Array);
    }
  }
  disconnect();
}


// ARDUINO entry point #2: runs over and over again forever
void loop() {

  if(digitalRead(UpdateSwitch)==LOW){
    updateCabinet();
    }
    delay(200);
}


// Open connection to the HTTP server
bool connect(IPAddress hostName) {

  Serial.print("Connect to ");
  Serial.println(hostName);

  bool ok = client.connect(hostName, 1880);

  Serial.println(ok ? "Connected" : "Connection Failed!");
  return ok;
}

// Send the HTTP GET request to the server
bool sendRequest(IPAddress host, const char* resource) {
  Serial.print("GET ");
  Serial.println(resource);

  client.print("GET ");
  client.print(resource);
  client.println(" HTTP/1.1");
  client.print("Host: ");
  client.println(host);
  client.println("Connection: close");
  client.println();

  return true;
}


// Skip HTTP headers so that we are at the beginning of the response's body
bool skipResponseHeaders() {
  // HTTP headers end with an empty line
  char endOfHeaders[] = "\r\n\r\n";

  client.setTimeout(HTTP_TIMEOUT);
  bool ok = client.find(endOfHeaders);

  if (!ok) {
    Serial.println("No response or invalid response!");
  }
  return ok;
}


// Close the connection with the HTTP server
void disconnect() {
  Serial.println("Disconnect");
  client.stop();
}


void printWifiStatus() {
  // print the SSID of the network you're attached to:
  Serial.print("SSID: ");
  Serial.println(WiFi.SSID());

  // print your board's IP address:
  IPAddress ip = WiFi.localIP();
  Serial.print("IP Address: ");
  Serial.println(ip);

  // print the received signal strength:
  long rssi = WiFi.RSSI();
  Serial.print("signal strength (RSSI):");
  Serial.print(rssi);
  Serial.println(" dBm");
}

void updateCabinet(){
    while (status != WL_CONNECTED) {
    Serial.print("Attempting to connect to SSID: ");
    Serial.println(ssid);
    // Connect to WPA/WPA2 network. Change this line if using open or WEP network:
    status = WiFi.begin(ssid, pass);

    // wait 10 seconds for connection:
    delay(5000);
  }
  Serial.println("Connected to wifi");

  analogWrite(oneONE, 0);
  analogWrite(oneTWO, 0);
  digitalWrite(oneTHREE, LOW);
  analogWrite(oneFOUR, 0);
  analogWrite(oneFIVE, 0);
  digitalWrite(oneSIX, LOW);
  analogWrite(twoONE, 0);
  analogWrite(twoTWO, 0);
  analogWrite(twoTHREE, 0);
  analogWrite(twoFOUR, 0);
  analogWrite(twoFIVE, 0);
  analogWrite(twoSIX, 0);
  analogWrite(threeONE, 0);
  analogWrite(threeTWO, 0);
  analogWrite(threeTHREE, 0);
  analogWrite(threeFOUR, 0);
  analogWrite(threeFIVE, 0);
  analogWrite(threeSIX, 0);

  printWifiStatus();

  if(connect(server)) {


    if(sendRequest(server, resource) && skipResponseHeaders()) {
      String payload = client.readString();//Get the request response payload

      deserializeJson(doc, payload);
      Serial.println(payload);
      JsonArray array = doc.as<JsonArray>();
      showLED(array);
    }
  }
  disconnect();
}

void showLED(JsonArray theArray){

byte numberOfItems = (sizeof(theArray));
 for(JsonVariant v: theArray){
  JsonObject obj = v.as<JsonObject>();
  String cabinetName = obj["cabinetName"].as<char*>();
    if(cabinetName == "next to com"){

    String cellName = obj["cellName"].as<char*>();
    Serial.println(cellName);
      if(cellName == "(1, 1)"){

        analogWrite(oneONE, 255);
      }
      else if(cellName == "(1, 2)"){
        analogWrite(oneTWO, 255);
      }
      else if(cellName == "(1, 3)"){
        digitalWrite(oneTHREE, HIGH);
        }
      else if(cellName == "(1, 4)"){
        analogWrite(oneFOUR, 255);
      }
      else if(cellName == "(1, 5)"){
        analogWrite(oneFIVE, 255);
      }
      else if(cellName == "(1, 6)"){
        digitalWrite(oneSIX, HIGH);
      }
      else if(cellName == "(2, 1)"){
        analogWrite(twoONE, 255);
      }
      else if(cellName == "(2, 2)"){
        analogWrite(twoTWO, 255);
      }
      else if(cellName == "(2, 3)"){
        analogWrite(twoTHREE, 255);
      }
      else if(cellName == "(2, 4)"){
        analogWrite(twoFOUR, 255);
      }
      else if(cellName == "(2, 5)"){
        analogWrite(twoFIVE, 255);
      }
      else if(cellName == "(2, 6)"){
        analogWrite(twoSIX, 255);
      }
      else if(cellName == "(3, 1)"){
        digitalWrite(threeONE, HIGH);
      }
      else if(cellName == "(3, 2)"){
        digitalWrite(threeTWO, HIGH);
      }
      else if(cellName == "(3, 3)"){
        analogWrite(threeTHREE, 255);
      }
      else if(cellName == "(3, 4)"){
        analogWrite(threeFOUR, 255);
      }
      else if(cellName == "(3, 5)"){
        analogWrite(threeFIVE, 255);
      }
      else if(cellName == "(3, 6)"){
        analogWrite(threeSIX, 255);
      }
    }
  }
  }
- 서랍장 칸의 개수가 많아진다면 위의 DynamicJsonDocument doc(숫자) 에서 숫자의 크기를 늘여줍니다.
- arduino_secrets.h 탭을 만들어 와이파이 이름인 ssid와 와이파이 비밀번호인 password를 입력해줍니다.

조립한 서랍장의 각 칸에 LED를 설치해주었습니다.
www.tinkercad.com/embed/8nKog6Gj1xG?editbtn=1"
LED를 넣은 케이스는 이렇게 만들었습니다.
LED는 3파이 크기의 파란색 LED입니다.

저항과 전선을 연결하고 연결 테스트를 진행했습니다.
같은 서랍장에 있는 칸들은 같은 색의 전선을 사용하여 구분했습니다.

아두이노도 연결해주었습니다.
중간 중간에 잘 작동하는지 꼭 확인해줍니다!
저항 하나가 문제면 나중에 다 빼고 다 다시 연결해야하는 아주 번거로운 상황이 벌어질 수 있으니까요.
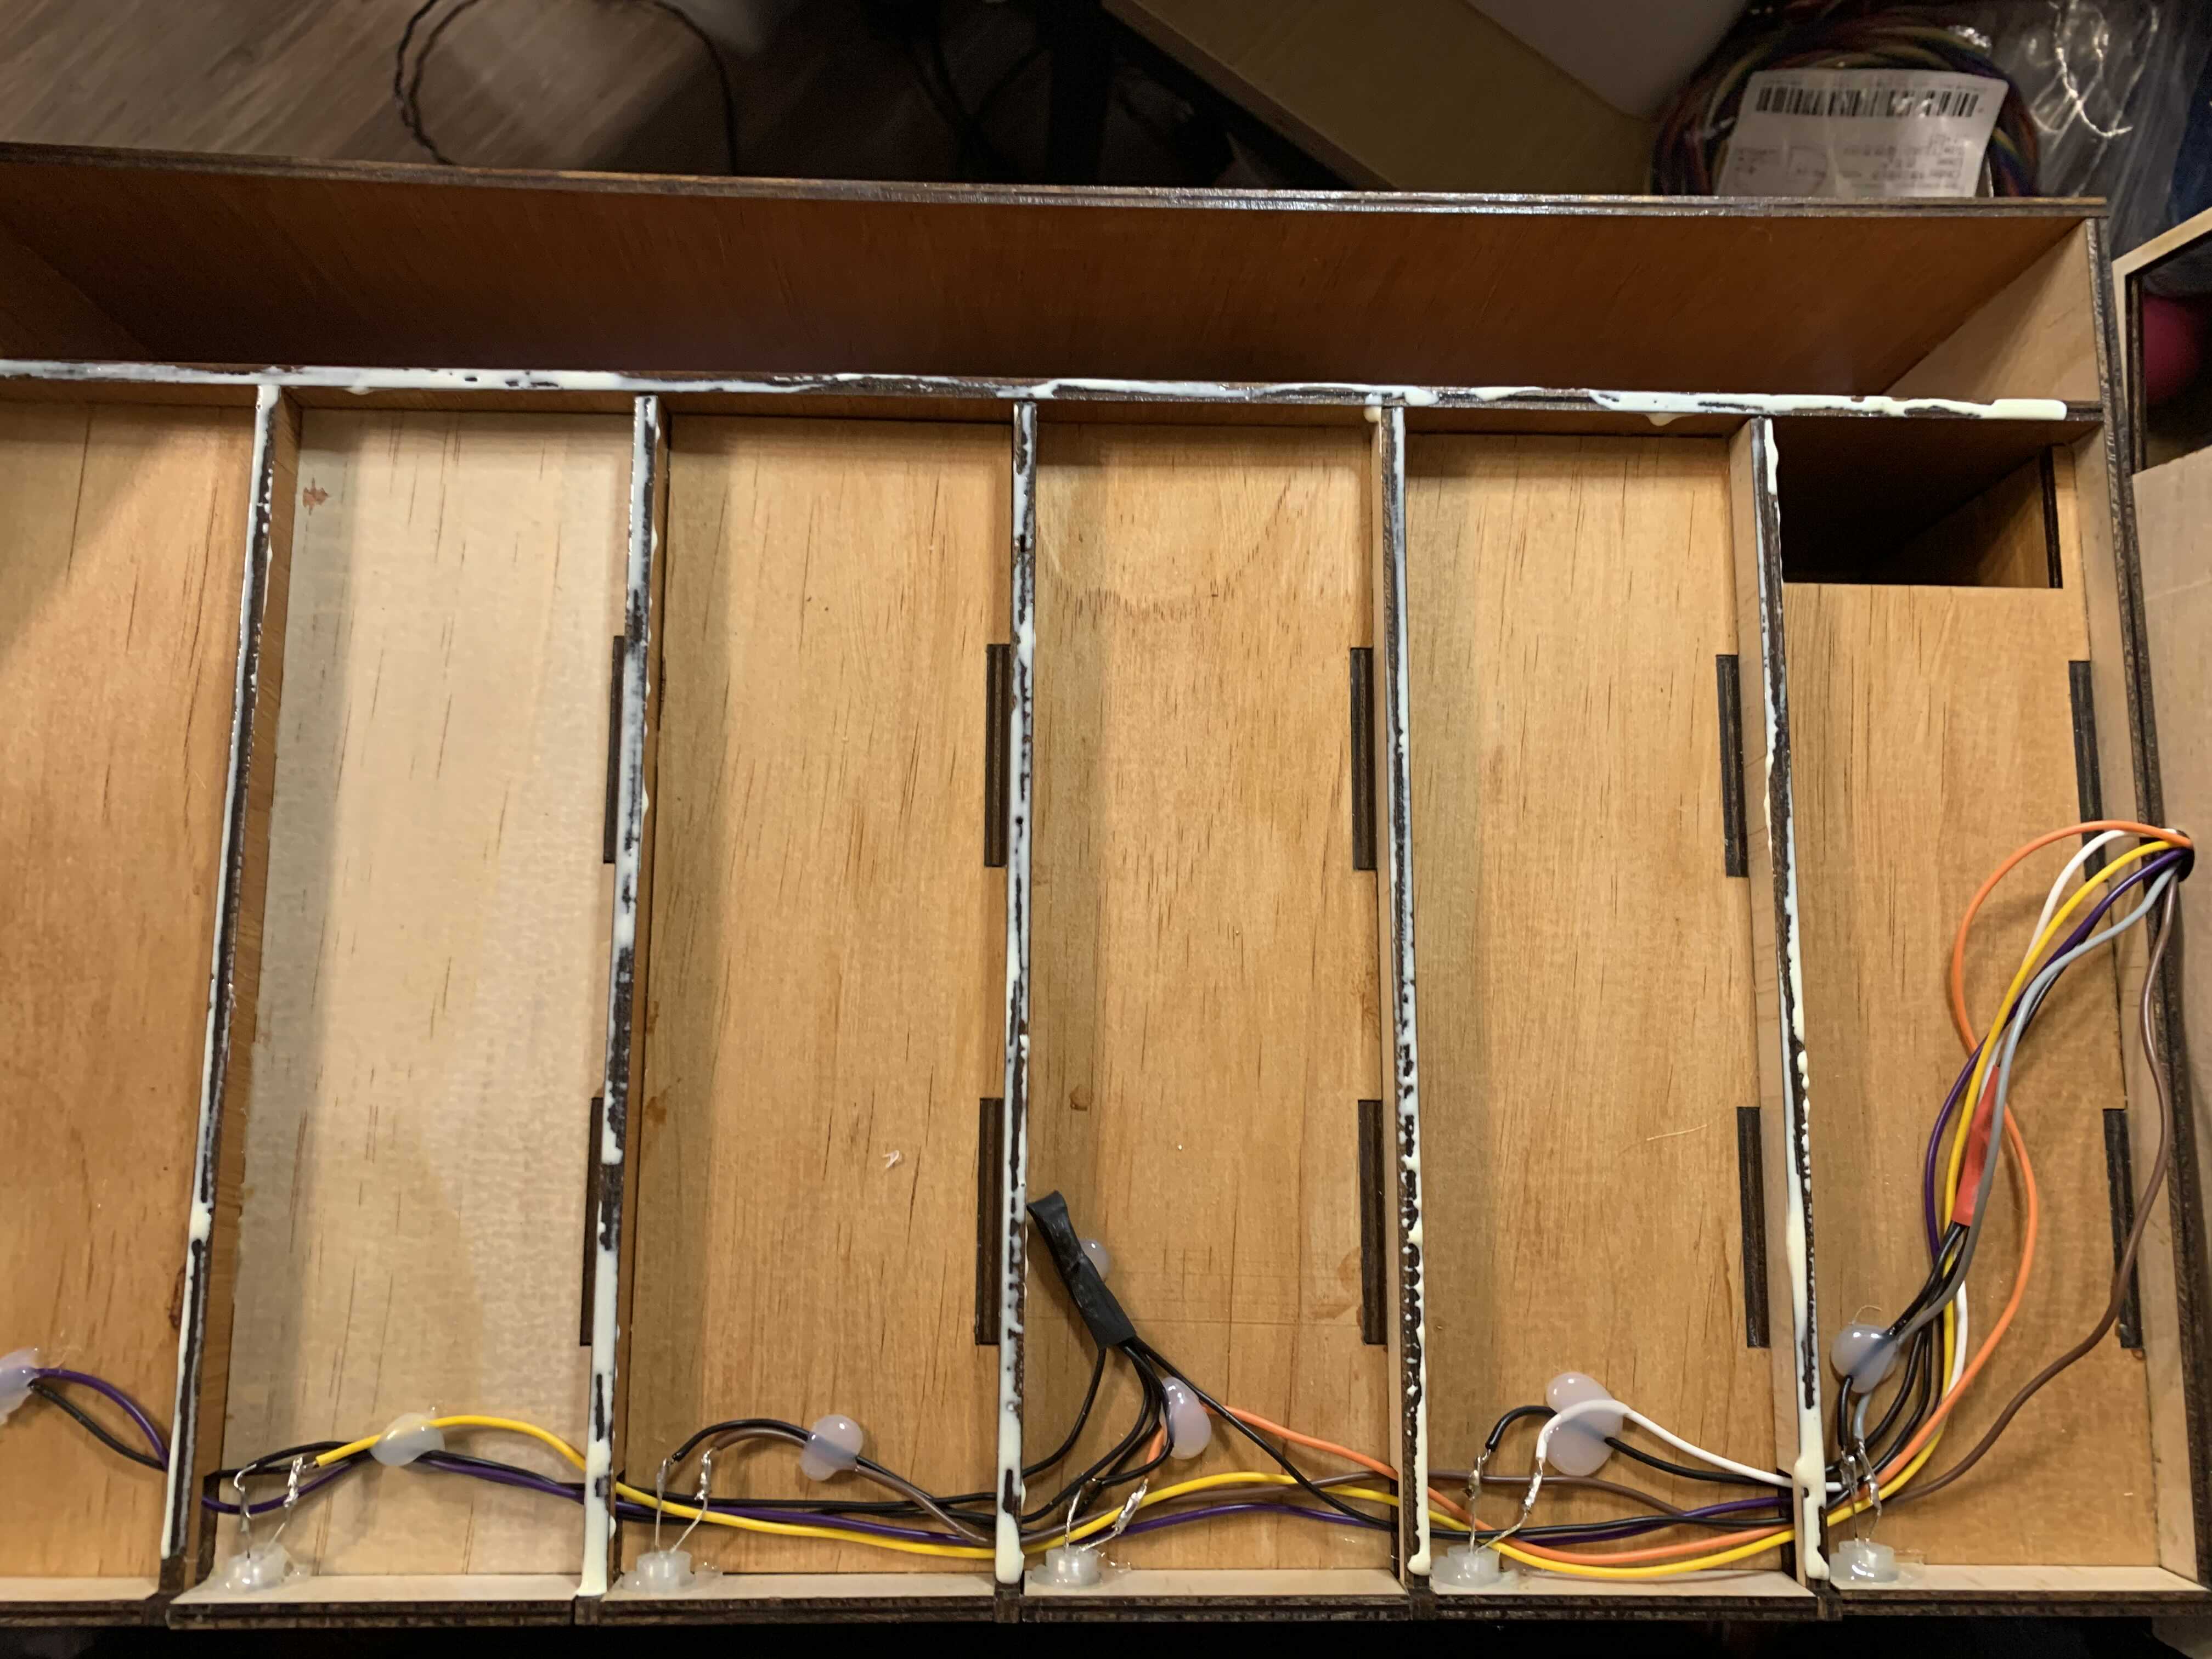
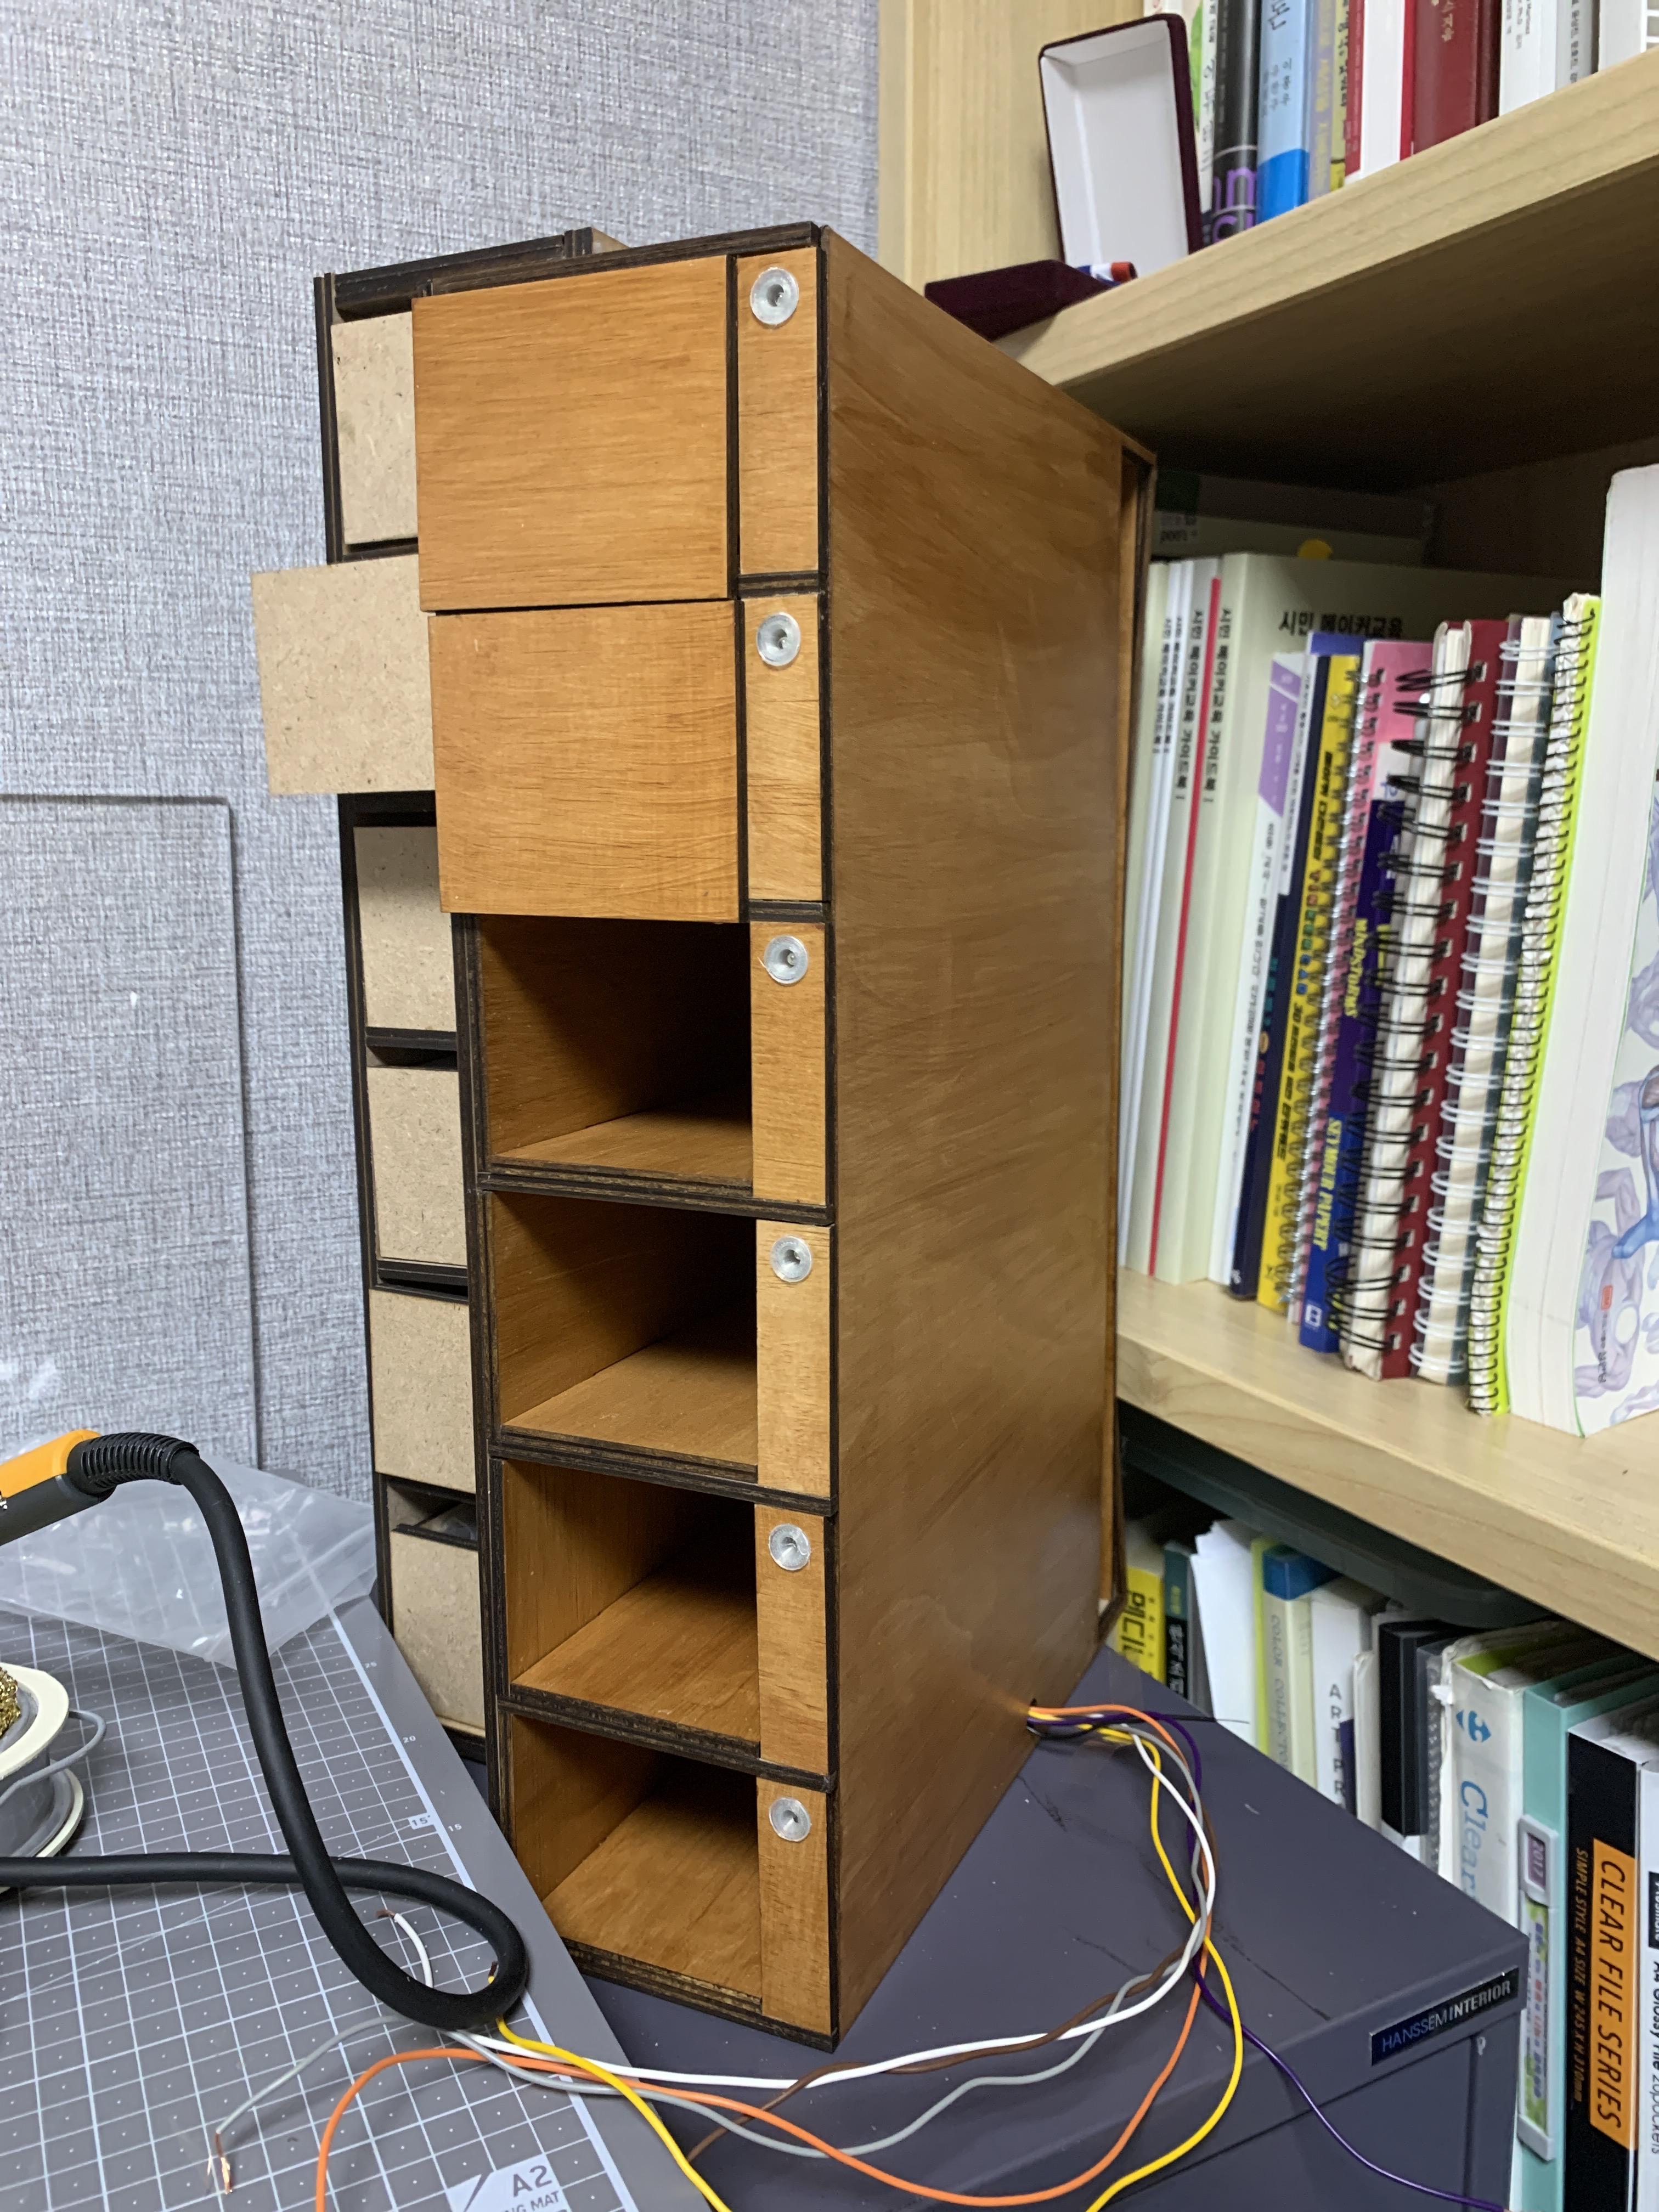
이 서랍장은 맨 왼쪽 첫번째 칸으로 할 거라서 전선을 구멍으로 빼주었습니다.
메인 보드는 중간 서랍장에 설치할 것입니다.
이제 마포로 나무 가지러 갔다오겠습니다~ :)
'MAKING > 우리반 쌤의 똑똑한 메이커 테이블' 카테고리의 다른 글
| 최종 작품_그거 어디있더라..반짝! 서랍장 (0) | 2021.01.06 |
|---|---|
| 최종 작품_2_서랍장X3 완성! (0) | 2021.01.06 |
| 목공탐구_프로토타입_1 (0) | 2020.12.20 |
| 최종 작품_어디서든 메모램프 (0) | 2020.12.20 |
| 최종 작품_3_하드웨어_완성!! (0) | 2020.12.19 |


댓글